

Change product prices in price lists
When you work with price lists, your selected customers can get different prices once they log in to the store with their email and password.
To manage the price of the products that are part of a specific list, you can do it one by one or in bulk.
Changing list prices individually
From the admin > Price lists > opening the list’s details, you can set the comparison price and the list price of the products.
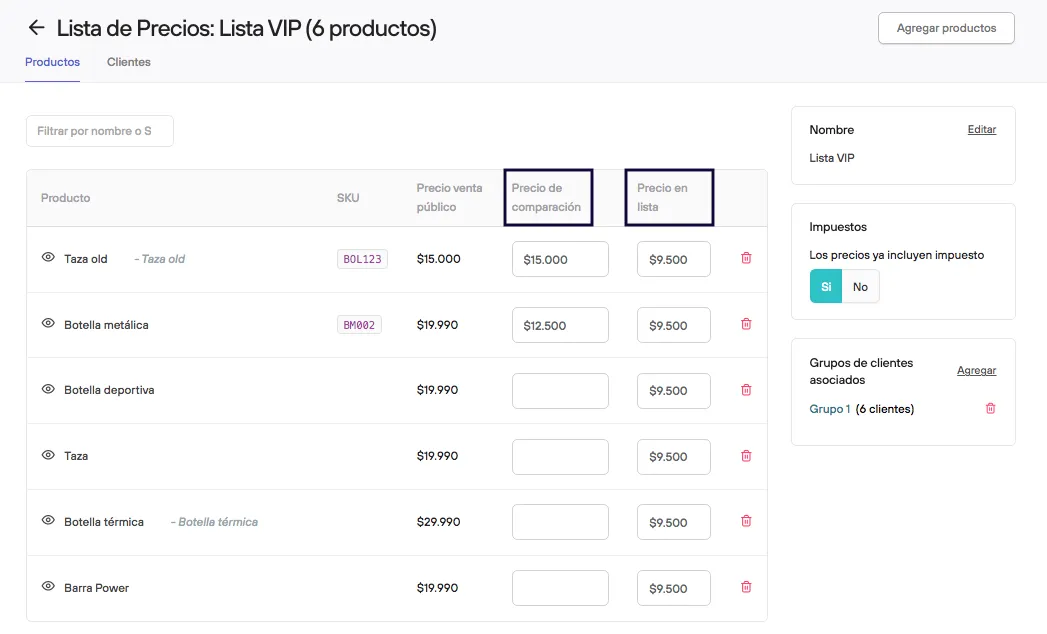
- Public sale price: The price that all users see when they browse your store publicly. It is set from the admin panel > products > by editing the specific product; it cannot be changed from the price list.
- Comparison price: The “sale price” a product can have within the list; this value is shown crossed out next to the list price.
- List price: The price the customer will finally pay when placing their order.
The comparison price and the list price are what your customer sees in the store once they log in with their email and password; if they don’t log in, they will only see the public sale price (this applies only to customers assigned to a price list).
To change comparison prices and/or list prices in bulk, for one or several price lists, you need to use a CSV spreadsheet, with the product identifier, price and price_comparison.
Changing prices with a bulk upload
Steps for the bulk upload
From your panel, in products, download the Prices by Variant spreadsheet (if you have products with more than one variant) or the prices by product one. You can apply filters first if needed, to download only the relevant products.
Import this file directly into Google Sheets so the columns are organized correctly.
When working with products with variants, you will see the following view.

Here are the details of the columns:
variant_idUnique identifier of each variant assigned by Bolder; this value is used to apply the changes you enter in the spreadsheetskuIdentifier for internal management assigned by your companyvariant_titleName of the variantregular_priceRegular pricesale_priceSale priceprice: namePrice for each list (name is the name of the list)
If you are only going to change list prices, you can delete the regular_price and sale_price columns.
Remember that your spreadsheet should only include the products you are going to change.
Once your spreadsheet is organized, you need to change the values.
- Change list prices
Change price: name to change the “List price” values, which is the final amount the customer will pay for their products.
- Change comparison prices
If you need to add or change a comparison price, add the comparison price column price_comparison:name in your spreadsheet next to the price column, where name is the name of the list

With all the price changes set up in your spreadsheet, download the file in CSV format. Import this file directly in products, selecting the corresponding operation
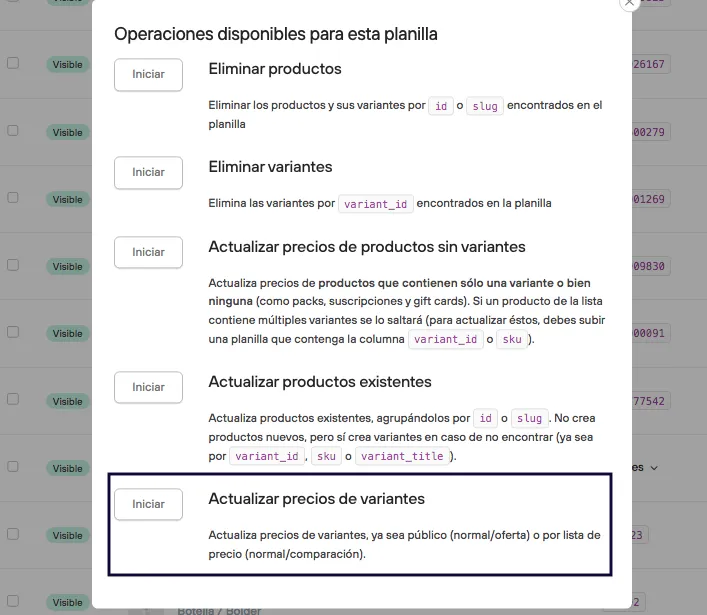
Once the data is processed successfully, check that the changes were applied.
If your upload does not show the changes, check that:
- The correct product identifier is being used (sku, id or variant_it)
- The column names are spelled correctly
- The comparison price is higher than the list price
If the spreadsheet meets these points and the upload is still not processed, you can contact our support team so they can help and guide you through making this change.