

Shipping options and costs
In this section you set up the shipping options available for the store. These options determine the alternatives customers can select during the checkout process.
Each shipping option defines its geographic availability, conditions of application, and cost structure.
This feature does not require additional activation, but you need to create and configure at least one shipping option so customers can complete their orders properly.
Create a new shipping option
From the admin panel > Preferences > Delivery options > Shipping options and costs you will see the shipping options directly, or, if you have more than one branch, you will see the different Shipping tables, since they let you define specific rules for each warehouse independently.
To create a new shipping option, you must fill in all the available fields, which are grouped into the following sections:
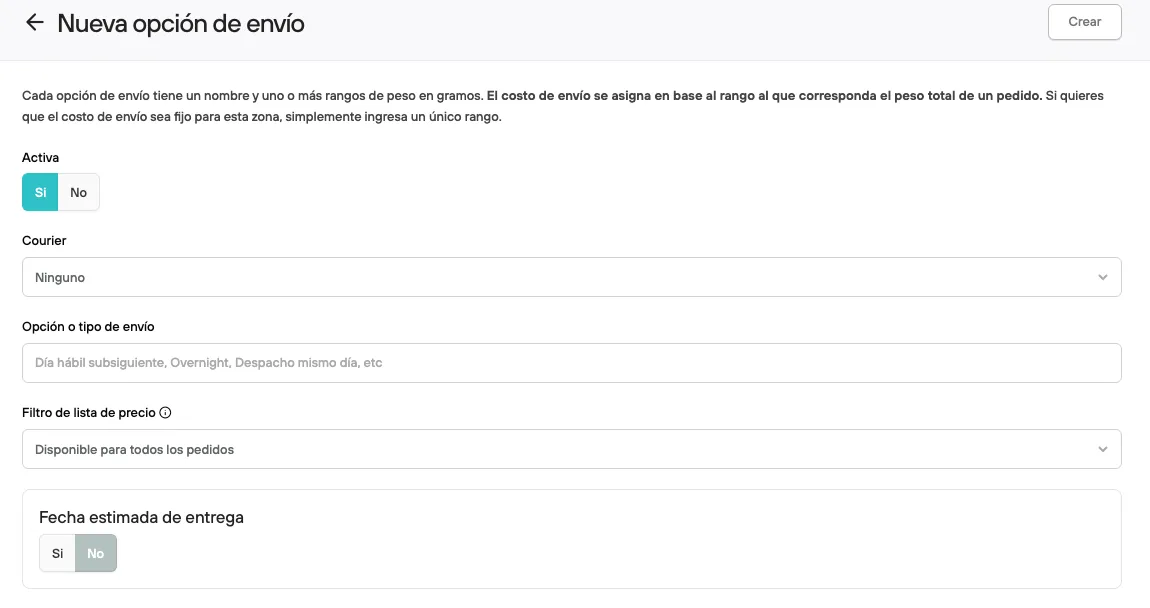
1. General information
Defines the main characteristics of the shipping option.
-
Active/ Inactive: Lets you enable or disable the shipping option. Only active options will be available at checkout.
-
Courier: Lets you link the option to a specific courier. This field is optional and is mainly used for internal management or logistics integrations.
If you don’t have active integrations, you can leave it as “None”
- Shipping option or type: Name shown to the customer at checkout.
Examples:
-
Standard shipping
-
Express shipping
-
Same-day delivery
-
Price list filter: Lets you restrict the shipping option to specific price lists or leave it available for all orders. Applies to stores with wholesale logistics.
-
Estimated delivery date: Lets you show the customer an estimated delivery date, with day and date, during checkout, improving transparency and the shopping experience. This setting is entirely optional.
2. Geographic zone
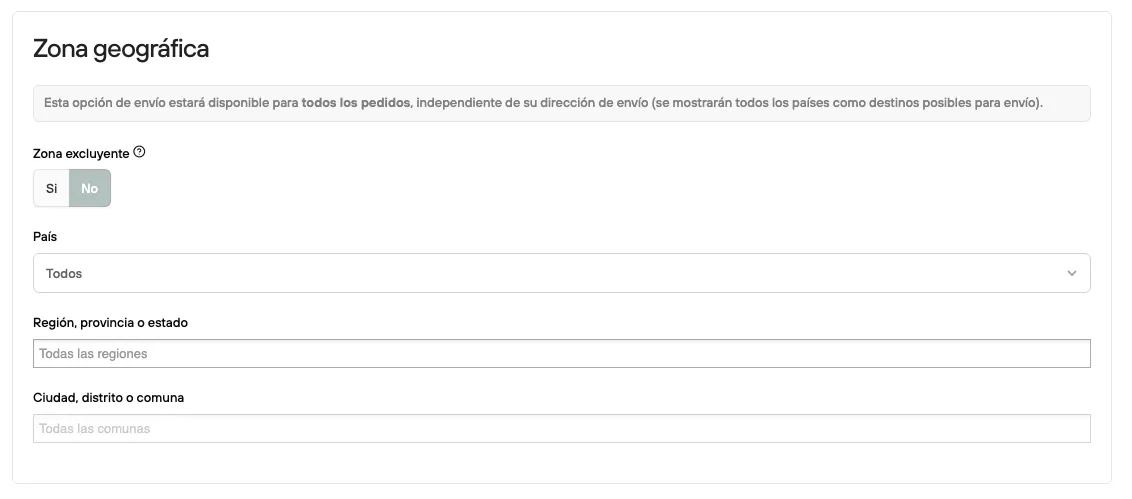
Defines the geographic scope where this shipping option will be available.
-
Exclusive zone: Lets you define whether this shipping option will be exclusive to the specified locations. If another shipping option also covers the location, only this option will be shown by default. (If you have logistics by region or commune, you don’t need to mark it as exclusive)
-
Country: Select the country where product shipping will be available.
-
Region, province, or state: Lets you limit the option to specific regions.
-
City, district, or commune: Lets you restrict the option to specific communes or cities.
The communes shown correspond exclusively to the official geographic division, so localities, neighborhoods, or sectors that are not part of this administrative classification are not included.
If no restrictions are selected, the option will be available for the whole region, without exception.
3. Costs
Defines how the shipping cost will be calculated. There are four modes:
A single value is applied to the shipment, regardless of weight or distance.
Required fields:
- Base cost: shipping value
- Maximum allowed weight (in grams): maximum limit that applies to this option
Lets you define different costs based on the total weight of the order.
Example:
- 0 to 1 kg → $3.000
- 1 to 5 kg → $5.000
The cost is calculated based on the distance between origin and destination.
Lets you define costs based on distance ranges.
Example:
- 0 to 5 km → $3.000
- 5 to 15 km → $6.000
For all options, if the maximum weight is exceeded, you can define how the cart behaves when an order exceeds the configured maximum weight:
- Don’t offer this shipping option
- Apply the cost of the highest weight range
- Apply a surcharge for each additional kg
Additional shipping settings
These settings let you define more specific operating conditions for each shipping option, such as available hours, delivery windows, custom zones, and related requirements.
Shipping/delivery availability
Lets you link an availability schedule to this shipping option. This defines the days and hours when the method will be available to customers at checkout.
Schedules are set up beforehand and then selected from this field.
Shipping/delivery windows
Lets you link available delivery windows to this shipping option. This lets the customer select a specific time block to receive their order, improving logistics planning and the delivery experience.
Windows must be set up beforehand and then assigned to the corresponding shipping option.
Associated polygons
Lets you limit the availability of this shipping option to specific geographic zones defined with polygons.
This is useful for defining custom coverage areas, such as delivery zones within a city or sectors with special delivery conditions.
Polygons are set up beforehand and can then be linked to the shipping option.
Make shipping options available
For shipping options to be available at checkout, you must define and link the corresponding shipping tables.
1. Define the default shipping table
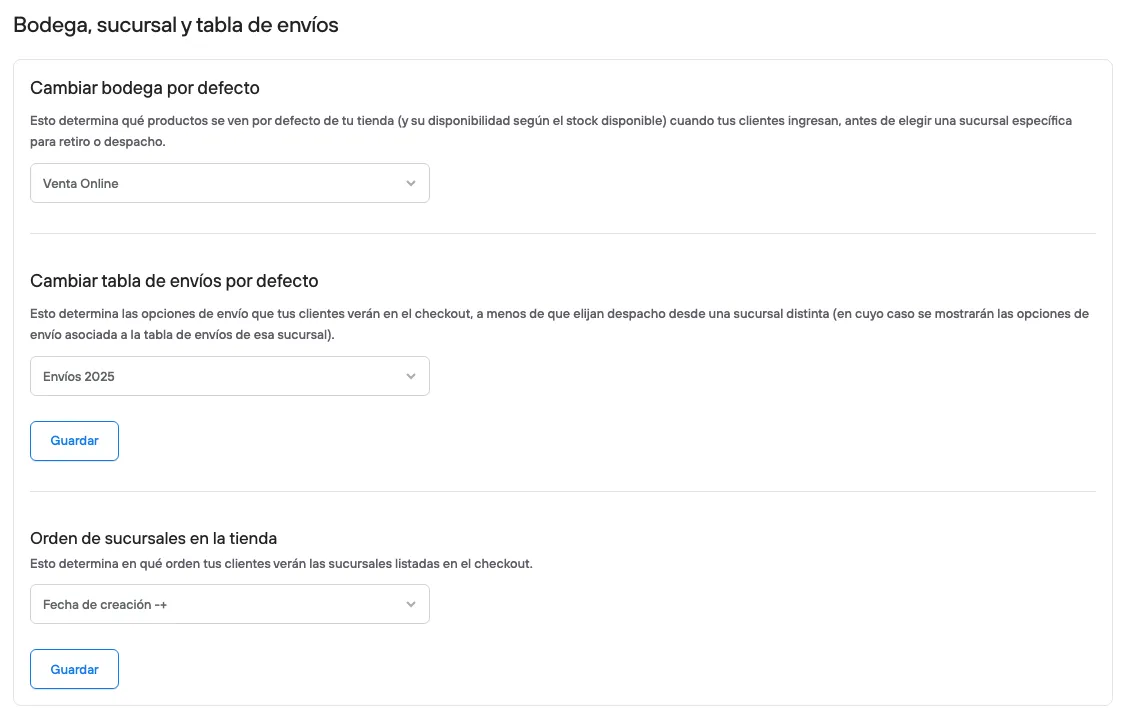
From the admin panel > Preferences > Delivery options > in Warehouse, branch, and shipping table, you can check and change the default shipping table.
This setting determines the shipping options shown to your customers during checkout.
The default shipping table applies to all orders, except when the customer selects shipping from a specific branch. In that case, the shipping options linked to the table set for that branch are shown.
2. Link a shipping table to branches
If you work with one or more branches with shipping enabled, you must assign a shipping table to each one:
- Go to the Branches section.
- Select the corresponding branch.
- Go to the Stock and delivery section.
- In the Shipping area, select the shipping table you want to link to that branch.
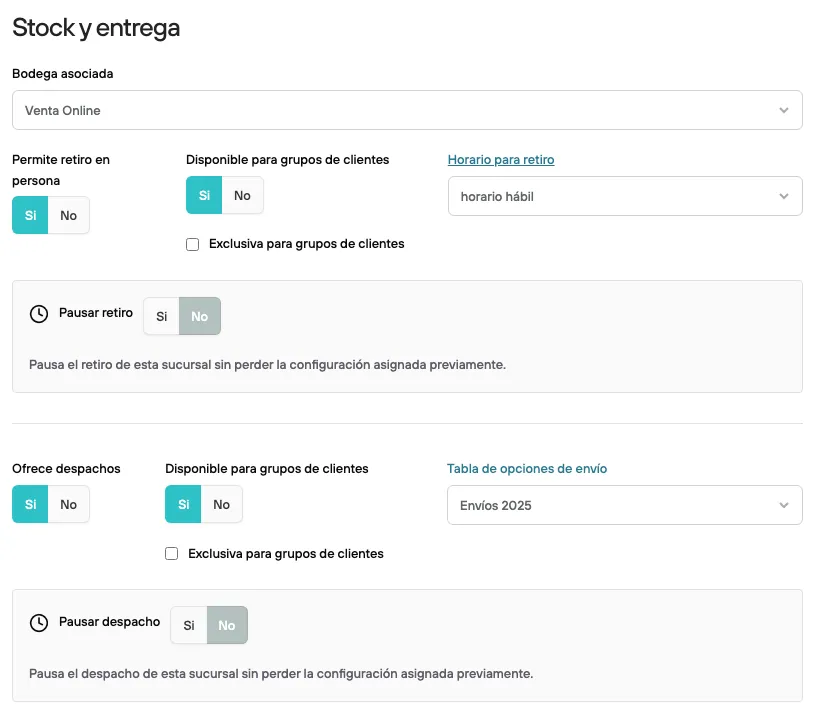
This lets you define specific shipping options based on the shipping origin, giving you more control and flexibility in your logistics setup.
Once the shipping options are created and configured, we always suggest validating the information with a test order, following the checkout flow.