

Setting up your own domain in Bolder
Important: The changes described in this section, if not done properly, can leave you without access to your email. If you have any questions, ask us (before making any kind of change).
All Bolder stores are hosted under a subdomain of your choice on the boldershops.com domain. For example, if you choose the subdomain “mystore” when creating your store, the public pages of your site can be viewed at “mystore.boldershops.com”.
This is fine for getting started and preparing your site, but soon you will want to use your own domain name and set up your store to use it.
Step 1: Buy the domain
Domain names have a cost and are provided by different companies or organizations, depending on the NIC, which is part of the Universidad de Chile.
Commercial / international domains such as “.com” or “.net” are sold by different companies or “registrars”. Some are GoDaddy, Dotster or 123.reg.
To use your own domain you must own the domain and be able to manage it in the web panel of the provider.
Step 2: Set up the DNS

DNS (Domain Name Servers) are the servers in charge of translating a domain name (for example www.onbolder.com ) to the IP address of the server where the site is hosted.
What you need to do is “point” a subdomain of your domain to Bolder’s servers. The most common subdomain is “www”.
Option 1: I manage my own DNS.
You can manage your domain’s DNS with specialized companies. Also, if you already have a company that provides hosting, they most likely also provide DNS service for your domain. You can ask them. This option gives you absolute control over the domain, including creating subdomains, pointing email traffic to your favorite email service, etc.
Assuming your Bolder store (TIENDA.boldershops.com ) should have the custom URL www.mitienda.com you need to do the following:
- Go to your provider’s DNS administration panel (in the vast majority of cases this tool can be cPanel). Find the section «DNS Editor» or «DNS Zone Editor».
- Create a CNAME record named
wwwthat must point toproxy.onbolder.com. - Wait a few hours (DNS changes take hours to spread across the internet). When your domain
www.mitienda.comshows a Bolder page, it means the domain is now pointed to our servers. - Go to your Bolder admin, navigate to Preferences and edit the «URL address» field with
www.mitienda.com. Save the change. - That’s it. Now the address
www.mitienda.comshould show your Bolder store - Figure 1.

Figure 1: URL address in the control panel
Option 2: I don’t have access to DNS
Important: If the domain you want to point to our DNS HAS email addresses associated with it (e.g. hugo@miempresa.com) you must let us know. If you make the change and don’t tell us, YOU WILL LOSE ACCESS to your email hugo@miempresa.com and therefore everyone who has email with that domain will too. In addition, also tell us the name of the company (or service) that will manage the email (Google apps, Outlook.com, etc).
Domain providers such as NIC in Chile (for “.cl” domains) usually don’t have integrated DNS management, so you have to explicitly set up the domain to use the DNS you prefer.
In these cases you can sign up for service with specialists such as EasyDNS or DNS Made Easy, which puts you in control of your domain and gives you advanced options.
However, if you only want to host your Bolder store under your domain and don’t plan to do anything else with it, you can set up the domain with your provider to point to our own DNS. The steps are:
-
Log in to your domain provider’s panel (NIC.cl in the case of Chile)
-
Find the DNS section and enter the following primary, secondary and tertiary servers:
ns1.linode.com(69.93.127.10)ns2.linode.com(65.19.178.10)ns3.linode.com(75.127.96.10)
-
Save the changes and wait a few hours. These changes take some time to spread from server to server.
-
Let us know when the change at your provider is ready. We need to do a small setup on our side.
-
When your domain shows a Bolder error page, it means the domain is now pointed to your Bolder site.
-
Go to your Bolder admin, navigate to preferences and edit the «URL address» field with
www.mitienda.com. Save the change. -
That’s it. Now the address
www.mitienda.comshould show your Bolder store.
NIC Chile
Below you will find the specific instructions for pointing your domain from NIC Chile to our DNS. This case applies to Option 2 described above — Figure 2.
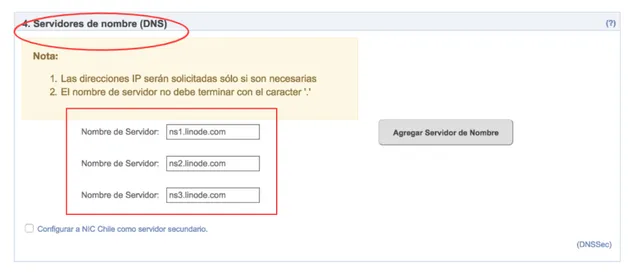
Figure 2: DNS setup in NIC.cl
-
Log in to NIC.cl (with your username and password).
-
Go to the control panel of your domains.
-
Click the name of the domain you want to point to our DNS.
-
Go to the Name servers (DNS) section.
-
Enter the following information for «Server name»:
- ns1.linode.com
- ns2.linode.com
- ns3.linode.com
-
Click the Update domain data button
-
Let us know by sending an email to soporte like this:
Subject: Registration of domain PUT_YOUR_DOMAIN_HERE at NIC.cl
Message: I just registered the domain PUT_YOUR_DOMAIN_HERE and pointed it to Bolder’s DNS. According to the documentation I must let you know.
How does DNS work?
Every time you visit the site www.onbolder.com, your browser does the following:
- it asks a Name Server (DNS) which IP address corresponds to the name “boldershops.com”.
- the DNS server responds in this case with “74.207.237.171” (our IP address)
- the browser visits the server with IP 74.207.237.171 and downloads the home page of our site.
- All of this happens without you, the user, noticing.
Bolder does not provide email hosting, but from your DNS management you can point your domain to handle email wherever you prefer.
If your DNS is managed by a hosting service, it may already provide email hosting and you may not have to do anything.
If you manage your DNS with a specialized service, you can look online for information on how to point your email traffic to the mail server of your choice.
If you host your DNS with us (if you set up your domain to point to our DNS - see “Option 2” above), then you must ask us to point your domain’s email traffic to your preferred email service.
Managing your email with Google Apps
Google Apps is a service provided by Google that lets you use Google tools such as Gmail, Google Docs, Calendar and others under your domain. This means you can have email with your own domain (for example ismael@mitienda.com) managed by Google and accessible the same way as a regular Gmail account.